The Android Compatibility Test Suite Verifier (CTS Verifier) is a supplement to
the Compatibility Test Suite (CTS). While CTS checks those APIs and functions
that can be automated, CTS Verifier provides tests for those APIs and functions
that cannot be tested on a stationary device without manual input, like audio
quality, touchscreen, accelerometer, camera, etc.
Test preparation
The device must have verified Android API compatibility by successfully passing
the Compatibility Test Suite.
Hardware requirements
- A Linux computer with USB 2.0 compatible port
- A second Android device with a known compatible Bluetooth, Wi-Fi direct, and
NFC Host Card Emulation (HCE) implementation
Setup
CTS Verifier test procedure
- After the CTS Verifier.apk has been installed, launch the CTS Verifier
application:

Figure 1. CTS Verifier icon
- Once opened, the CTS Verifier displays a list of all test sets available for
manual verification:

Figure 2. CTS Verifier menu of tests
- Each test contains a set of common elements (in some tests, Pass/Fail is
determined automatically):
- Info—a set of instructions to run the test. This will appear as a popup the first
time each test is opened or whenever the Info button (?) is pressed.
- Pass—If the DUT meets the test requirements per the instructions from Info, press
the Pass button (✓).
- Fail—If the DUT does not meet the test requirements per the instructions from Info,
press the Fail button (!).

Figure 3. Video quality verifier
Specific test requirements
USB Accessory
In order to run the USB Accessory test, you need a Linux computer to run the
USB desktop machine (host) program.
- Connect the DUT to a computer.
- Execute the cts-usb-accessory program on the computer found in the CTS Verifier
package.
./cts-usb-accessory
- A popup message will appear on the DUT. Select OK and go into the USB Accessory Test in the CTS Verifier application.

Figure 4. Screen lock test
- Output similar to below will appear on the computer’s console.
CTS USB Accessory Tester
Found possible Android device (413c:2106) - attempting to switch to accessory
mode...
Failed to read protocol version
Found Android device in accessory mode (18d1:2d01)...
[RECV] Message from Android device #0
[SENT] Message from Android accessory #0
[RECV] Message from Android device #1
[SENT] Message from Android accessory #1
[RECV] Message from Android device #2
[SENT] Message from Android accessory #2
[RECV] Message from Android device #3
[SENT] Message from Android accessory #3
[RECV] Message from Android device #4
[SENT] Message from Android accessory #4
[RECV] Message from Android device #5
[SENT] Message from Android accessory #5
[RECV] Message from Android device #6
[SENT] Message from Android accessory #6
[RECV] Message from Android device #7
[SENT] Message from Android accessory #7
[RECV] Message from Android device #8
[SENT] Message from Android accessory #8
[RECV] Message from Android device #9
[SENT] Message from Android accessory #9
[RECV] Message from Android device #10
[SENT] Message from Android accessory #10
Camera field of view calibration
This field of view calibration procedure is designed to be a quick way to
determine the device field of view with moderate accuracy.
Setup - Print the calibration-pattern.pdf
target file and mount it on a rigid backing. Print on 11” x 17” or A3. Orient
the camera device and the printed target as shown in the diagram below:

Figure 5. Camera printed target
Setting the target width - Measure the distance between the
solid lines on the target pattern in centimeters to account for printing
inaccuracies (~38 cm).
- Start the calibration application.
- Press the setup button and select “Marker distance” to enter the distance.
- Measure and enter the distance to the target pattern (~100 cm).
- Press the back button to return to the calibration preview.
Calibration process - Verify that the device and target are
placed as shown in the figure and the correct distances have been entered into
the setup dialog.The preview will display the image with a vertical line
overlaid onto it. This line should align with the center line of the target
pattern. The transparent grid can be used with the other vertical lines to
ensure that the optical axis is orthogonal to the target.
- Select an image resolution to test from the selector at the bottom left.
- Tap the screen to take a photo and enter the calibration mode (described
below).
- Hit the back button and repeat for all supported image resolutions.
Calibration test (per resolution) In the calibration mode, the photo will be displayed with two vertical lines
overlaid onto the image.These lines should align with the vertical lines on the target pattern within a
few pixels. If they do not, then the reported field of view for that mode is
inaccurate (assuming the setup is correct).Adjust the slider at the bottom of the screen until the overlay aligns with the
target pattern as closely as possible. The displayed field of view will be a
close approximation to the correct value when the overlay and the target
pattern image are aligned. The reported field of view should be within +/-1
degree of the calibration value.
Exporting test reports
-
After all tests are completed, tap the Save (disk) icon.

Figure 6. CTS Verifier Save icon. Note: In
Android 7.0 and later, the preview feature is removed:

-
A path to the saved report will be displayed in pop-up (e.g.
/sdcard/verifierReports/ctsVerifierReport-date-time.zip).
Record the path.
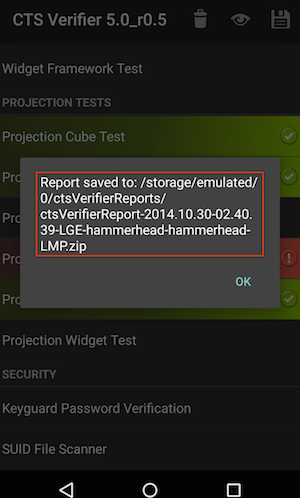
Figure 7. CTS Verifier path to saved report
-
Connect the device via USB to a computer with the SDK installed.
-
From the computer’s SDK installation, run
adb pull CTSVerifierReportPath to download the report from the device.