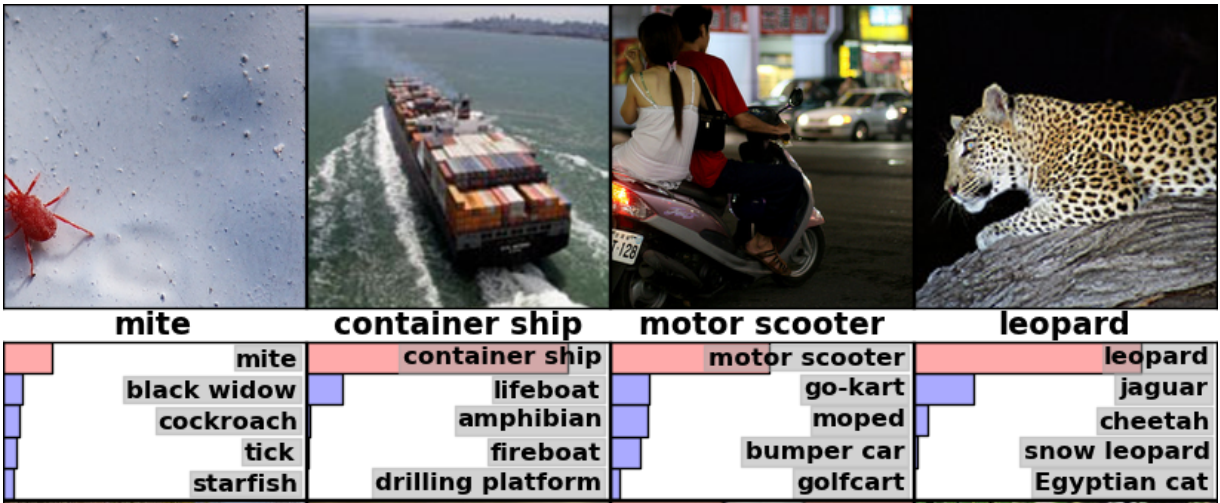
      1 # Image Recognition
      2
      3 Our brains make vision seem easy. It doesn't take any effort for humans to
      4 tell apart a lion and a jaguar, read a sign, or recognize a human's face.
      5 But these are actually hard problems to solve with a computer: they only
      6 seem easy because our brains are incredibly good at understanding images.
      7
      8 In the last few years, the field of machine learning has made tremendous
      9 progress on addressing these difficult problems. In particular, we've
     10 found that a kind of model called a deep
     11 [convolutional neural network](https://colah.github.io/posts/2014-07-Conv-Nets-Modular/)
     12 can achieve reasonable performance on hard visual recognition tasks --
     13 matching or exceeding human performance in some domains.
     14
     15 Researchers have demonstrated steady progress
     16 in computer vision by validating their work against
     17 [ImageNet](http://www.image-net.org) -- an academic benchmark for computer vision.
     18 Successive models continue to show improvements, each time achieving
     19 a new state-of-the-art result:
     20 [QuocNet], [AlexNet], [Inception (GoogLeNet)], [BN-Inception-v2].
     21 Researchers both internal and external to Google have published papers describing all
     22 these models but the results are still hard to reproduce.
     23 We're now taking the next step by releasing code for running image recognition
     24 on our latest model, [Inception-v3].
     25
     26 [QuocNet]: https://static.googleusercontent.com/media/research.google.com/en//archive/unsupervised_icml2012.pdf
     27 [AlexNet]: https://www.cs.toronto.edu/~fritz/absps/imagenet.pdf
     28 [Inception (GoogLeNet)]: https://arxiv.org/abs/1409.4842
     29 [BN-Inception-v2]: https://arxiv.org/abs/1502.03167
     30 [Inception-v3]: https://arxiv.org/abs/1512.00567
     31
     32 Inception-v3 is trained for the [ImageNet] Large Visual Recognition Challenge
     33 using the data from 2012. This is a standard task in computer vision,
     34 where models try to classify entire
     35 images into [1000 classes], like "Zebra", "Dalmatian", and "Dishwasher".
     36 For example, here are the results from [AlexNet] classifying some images:
     37
     38 <div style="width:50%; margin:auto; margin-bottom:10px; margin-top:20px;">
     39 <img style="width:100%" src="https://www.tensorflow.org/images/AlexClassification.png">
     40 </div>
     41
     42 To compare models, we examine how often the model fails to predict the
     43 correct answer as one of their top 5 guesses -- termed "top-5 error rate".
     44 [AlexNet] achieved by setting a top-5 error rate of 15.3% on the 2012
     45 validation data set; [Inception (GoogLeNet)] achieved 6.67%;
     46 [BN-Inception-v2] achieved 4.9%; [Inception-v3] reaches 3.46%.
     47
     48 > How well do humans do on ImageNet Challenge? There's a [blog post] by
     49 Andrej Karpathy who attempted to measure his own performance. He reached
     50 5.1% top-5 error rate.
     51
     52 [ImageNet]: http://image-net.org/
     53 [1000 classes]: http://image-net.org/challenges/LSVRC/2014/browse-synsets
     54 [blog post]: https://karpathy.github.io/2014/09/02/what-i-learned-from-competing-against-a-convnet-on-imagenet/
     55
     56 This tutorial will teach you how to use [Inception-v3]. You'll learn how to
     57 classify images into [1000 classes] in Python or C++. We'll also discuss how to
     58 extract higher level features from this model which may be reused for other
     59 vision tasks.
     60
     61 We're excited to see what the community will do with this model.
     62
     63
     64 ##Usage with Python API
     65
     66 `classify_image.py` downloads the trained model from `tensorflow.org`
     67 when the program is run for the first time. You'll need about 200M of free space
     68 available on your hard disk.
     69
     70 Start by cloning the [TensorFlow models repo](https://github.com/tensorflow/models) from GitHub. Run the following commands:
     71
     72     cd models/tutorials/image/imagenet
     73     python classify_image.py
     74
     75 The above command will classify a supplied image of a panda bear.
     76
     77 <div style="width:15%; margin:auto; margin-bottom:10px; margin-top:20px;">
     78   <img style="width:100%" src="https://www.tensorflow.org/images/cropped_panda.jpg">
     79 </div>
     80
     81 If the model runs correctly, the script will produce the following output:
     82
     83     giant panda, panda, panda bear, coon bear, Ailuropoda melanoleuca (score = 0.88493)
     84     indri, indris, Indri indri, Indri brevicaudatus (score = 0.00878)
     85     lesser panda, red panda, panda, bear cat, cat bear, Ailurus fulgens (score = 0.00317)
     86     custard apple (score = 0.00149)
     87     earthstar (score = 0.00127)
     88
     89 If you wish to supply other JPEG images, you may do so by editing
     90 the `--image_file` argument.
     91
     92 > If you download the model data to a different directory, you
     93 will need to point `--model_dir`  to the directory used.
     94
     95 ## Usage with the C++ API
     96
     97 You can run the same [Inception-v3] model in C++ for use in production
     98 environments. You can download the archive containing the GraphDef that defines
     99 the model like this (running from the root directory of the TensorFlow
    100 repository):
    101
    102 ```bash
    103 curl -L "https://storage.googleapis.com/download.tensorflow.org/models/inception_v3_2016_08_28_frozen.pb.tar.gz" |
    104   tar -C tensorflow/examples/label_image/data -xz
    105 ```
    106
    107 Next, we need to compile the C++ binary that includes the code to load and run the graph.
    108 If you've followed
    109 @{$install_sources$the instructions to download the source installation of TensorFlow}
    110 for your platform, you should be able to build the example by
    111 running this command from your shell terminal:
    112
    113 ```bash
    114 bazel build tensorflow/examples/label_image/...
    115 ```
    116
    117 That should create a binary executable that you can then run like this:
    118
    119 ```bash
    120 bazel-bin/tensorflow/examples/label_image/label_image
    121 ```
    122
    123 This uses the default example image that ships with the framework, and should
    124 output something similar to this:
    125
    126 ```
    127 I tensorflow/examples/label_image/main.cc:206] military uniform (653): 0.834306
    128 I tensorflow/examples/label_image/main.cc:206] mortarboard (668): 0.0218692
    129 I tensorflow/examples/label_image/main.cc:206] academic gown (401): 0.0103579
    130 I tensorflow/examples/label_image/main.cc:206] pickelhaube (716): 0.00800814
    131 I tensorflow/examples/label_image/main.cc:206] bulletproof vest (466): 0.00535088
    132 ```
    133 In this case, we're using the default image of
    134 [Admiral Grace Hopper](https://en.wikipedia.org/wiki/Grace_Hopper), and you can
    135 see the network correctly identifies she's wearing a military uniform, with a high
    136 score of 0.8.
    137
    138
    139 <div style="width:45%; margin:auto; margin-bottom:10px; margin-top:20px;">
    140   <img style="width:100%" src="https://www.tensorflow.org/images/grace_hopper.jpg">
    141 </div>
    142
    143 Next, try it out on your own images by supplying the --image= argument, e.g.
    144
    145 ```bash
    146 bazel-bin/tensorflow/examples/label_image/label_image --image=my_image.png
    147 ```
    148
    149 If you look inside the [`tensorflow/examples/label_image/main.cc`](https://github.com/tensorflow/tensorflow/blob/master/tensorflow/examples/label_image/main.cc)
    150 file, you can find out
    151 how it works. We hope this code will help you integrate TensorFlow into
    152 your own applications, so we will walk step by step through the main functions:
    153
    154 The command line flags control where the files are loaded from, and properties of the input images.
    155 The model expects to get square 299x299 RGB images, so those are the `input_width`
    156 and `input_height` flags. We also need to scale the pixel values from integers that
    157 are between 0 and 255 to the floating point values that the graph operates on.
    158 We control the scaling with the `input_mean` and `input_std` flags: we first subtract
    159 `input_mean` from each pixel value, then divide it by `input_std`.
    160
    161 These values probably look somewhat magical, but they are just defined by the
    162 original model author based on what he/she wanted to use as input images for
    163 training. If you have a graph that you've trained yourself, you'll just need
    164 to adjust the values to match whatever you used during your training process.
    165
    166 You can see how they're applied to an image in the
    167 [`ReadTensorFromImageFile()`](https://github.com/tensorflow/tensorflow/blob/master/tensorflow/examples/label_image/main.cc#L88)
    168 function.
    169
    170 ```C++
    171 // Given an image file name, read in the data, try to decode it as an image,
    172 // resize it to the requested size, and then scale the values as desired.
    173 Status ReadTensorFromImageFile(string file_name, const int input_height,
    174                                const int input_width, const float input_mean,
    175                                const float input_std,
    176                                std::vector<Tensor>* out_tensors) {
    177   tensorflow::GraphDefBuilder b;
    178 ```
    179 We start by creating a `GraphDefBuilder`, which is an object we can use to
    180 specify a model to run or load.
    181
    182 ```C++
    183   string input_name = "file_reader";
    184   string output_name = "normalized";
    185   tensorflow::Node* file_reader =
    186       tensorflow::ops::ReadFile(tensorflow::ops::Const(file_name, b.opts()),
    187                                 b.opts().WithName(input_name));
    188 ```
    189 We then start creating nodes for the small model we want to run
    190 to load, resize, and scale the pixel values to get the result the main model
    191 expects as its input. The first node we create is just a `Const` op that holds a
    192 tensor with the file name of the image we want to load. That's then passed as the
    193 first input to the `ReadFile` op. You might notice we're passing `b.opts()` as the last
    194 argument to all the op creation functions. The argument ensures that the node is added to
    195 the model definition held in the `GraphDefBuilder`. We also name the `ReadFile`
    196 operator by making the `WithName()` call to `b.opts()`. This gives a name to the node,
    197 which isn't strictly necessary since an automatic name will be assigned if you don't
    198 do this, but it does make debugging a bit easier.
    199
    200 ```C++
    201   // Now try to figure out what kind of file it is and decode it.
    202   const int wanted_channels = 3;
    203   tensorflow::Node* image_reader;
    204   if (tensorflow::StringPiece(file_name).ends_with(".png")) {
    205     image_reader = tensorflow::ops::DecodePng(
    206         file_reader,
    207         b.opts().WithAttr("channels", wanted_channels).WithName("png_reader"));
    208   } else {
    209     // Assume if it's not a PNG then it must be a JPEG.
    210     image_reader = tensorflow::ops::DecodeJpeg(
    211         file_reader,
    212         b.opts().WithAttr("channels", wanted_channels).WithName("jpeg_reader"));
    213   }
    214   // Now cast the image data to float so we can do normal math on it.
    215   tensorflow::Node* float_caster = tensorflow::ops::Cast(
    216       image_reader, tensorflow::DT_FLOAT, b.opts().WithName("float_caster"));
    217   // The convention for image ops in TensorFlow is that all images are expected
    218   // to be in batches, so that they're four-dimensional arrays with indices of
    219   // [batch, height, width, channel]. Because we only have a single image, we
    220   // have to add a batch dimension of 1 to the start with ExpandDims().
    221   tensorflow::Node* dims_expander = tensorflow::ops::ExpandDims(
    222       float_caster, tensorflow::ops::Const(0, b.opts()), b.opts());
    223   // Bilinearly resize the image to fit the required dimensions.
    224   tensorflow::Node* resized = tensorflow::ops::ResizeBilinear(
    225       dims_expander, tensorflow::ops::Const({input_height, input_width},
    226                                             b.opts().WithName("size")),
    227       b.opts());
    228   // Subtract the mean and divide by the scale.
    229   tensorflow::ops::Div(
    230       tensorflow::ops::Sub(
    231           resized, tensorflow::ops::Const({input_mean}, b.opts()), b.opts()),
    232       tensorflow::ops::Const({input_std}, b.opts()),
    233       b.opts().WithName(output_name));
    234 ```
    235 We then keep adding more nodes, to decode the file data as an image, to cast the
    236 integers into floating point values, to resize it, and then finally to run the
    237 subtraction and division operations on the pixel values.
    238
    239 ```C++
    240   // This runs the GraphDef network definition that we've just constructed, and
    241   // returns the results in the output tensor.
    242   tensorflow::GraphDef graph;
    243   TF_RETURN_IF_ERROR(b.ToGraphDef(&graph));
    244 ```
    245 At the end of this we have
    246 a model definition stored in the b variable, which we turn into a full graph
    247 definition with the `ToGraphDef()` function.
    248
    249 ```C++
    250   std::unique_ptr<tensorflow::Session> session(
    251       tensorflow::NewSession(tensorflow::SessionOptions()));
    252   TF_RETURN_IF_ERROR(session->Create(graph));
    253   TF_RETURN_IF_ERROR(session->Run({}, {output_name}, {}, out_tensors));
    254   return Status::OK();
    255 ```
    256 Then we create a @{tf.Session}
    257 object, which is the interface to actually running the graph, and run it,
    258 specifying which node we want to get the output from, and where to put the
    259 output data.
    260
    261 This gives us a vector of `Tensor` objects, which in this case we know will only be a
    262 single object long. You can think of a `Tensor` as a multi-dimensional array in this
    263 context, and it holds a 299 pixel high, 299 pixel wide, 3 channel image as float
    264 values. If you have your own image-processing framework in your product already, you
    265 should be able to use that instead, as long as you apply the same transformations
    266 before you feed images into the main graph.
    267
    268 This is a simple example of creating a small TensorFlow graph dynamically in C++,
    269 but for the pre-trained Inception model we want to load a much larger definition from
    270 a file. You can see how we do that in the `LoadGraph()` function.
    271
    272 ```C++
    273 // Reads a model graph definition from disk, and creates a session object you
    274 // can use to run it.
    275 Status LoadGraph(string graph_file_name,
    276                  std::unique_ptr<tensorflow::Session>* session) {
    277   tensorflow::GraphDef graph_def;
    278   Status load_graph_status =
    279       ReadBinaryProto(tensorflow::Env::Default(), graph_file_name, &graph_def);
    280   if (!load_graph_status.ok()) {
    281     return tensorflow::errors::NotFound("Failed to load compute graph at '",
    282                                         graph_file_name, "'");
    283   }
    284 ```
    285 If you've looked through the image loading code, a lot of the terms should seem familiar. Rather than
    286 using a `GraphDefBuilder` to produce a `GraphDef` object, we load a protobuf file that
    287 directly contains the `GraphDef`.
    288
    289 ```C++
    290   session->reset(tensorflow::NewSession(tensorflow::SessionOptions()));
    291   Status session_create_status = (*session)->Create(graph_def);
    292   if (!session_create_status.ok()) {
    293     return session_create_status;
    294   }
    295   return Status::OK();
    296 }
    297 ```
    298 Then we create a Session object from that `GraphDef` and
    299 pass it back to the caller so that they can run it at a later time.
    300
    301 The `GetTopLabels()` function is a lot like the image loading, except that in this case
    302 we want to take the results of running the main graph, and turn it into a sorted list
    303 of the highest-scoring labels. Just like the image loader, it creates a
    304 `GraphDefBuilder`, adds a couple of nodes to it, and then runs the short graph to get a
    305 pair of output tensors. In this case they represent the sorted scores and index
    306 positions of the highest results.
    307
    308 ```C++
    309 // Analyzes the output of the Inception graph to retrieve the highest scores and
    310 // their positions in the tensor, which correspond to categories.
    311 Status GetTopLabels(const std::vector<Tensor>& outputs, int how_many_labels,
    312                     Tensor* indices, Tensor* scores) {
    313   tensorflow::GraphDefBuilder b;
    314   string output_name = "top_k";
    315   tensorflow::ops::TopK(tensorflow::ops::Const(outputs[0], b.opts()),
    316                         how_many_labels, b.opts().WithName(output_name));
    317   // This runs the GraphDef network definition that we've just constructed, and
    318   // returns the results in the output tensors.
    319   tensorflow::GraphDef graph;
    320   TF_RETURN_IF_ERROR(b.ToGraphDef(&graph));
    321   std::unique_ptr<tensorflow::Session> session(
    322       tensorflow::NewSession(tensorflow::SessionOptions()));
    323   TF_RETURN_IF_ERROR(session->Create(graph));
    324   // The TopK node returns two outputs, the scores and their original indices,
    325   // so we have to append :0 and :1 to specify them both.
    326   std::vector<Tensor> out_tensors;
    327   TF_RETURN_IF_ERROR(session->Run({}, {output_name + ":0", output_name + ":1"},
    328                                   {}, &out_tensors));
    329   *scores = out_tensors[0];
    330   *indices = out_tensors[1];
    331   return Status::OK();
    332 ```
    333 The `PrintTopLabels()` function takes those sorted results, and prints them out in a
    334 friendly way. The `CheckTopLabel()` function is very similar, but just makes sure that
    335 the top label is the one we expect, for debugging purposes.
    336
    337 At the end, [`main()`](https://github.com/tensorflow/tensorflow/blob/master/tensorflow/examples/label_image/main.cc#L252)
    338 ties together all of these calls.
    339
    340 ```C++
    341 int main(int argc, char* argv[]) {
    342   // We need to call this to set up global state for TensorFlow.
    343   tensorflow::port::InitMain(argv[0], &argc, &argv);
    344   Status s = tensorflow::ParseCommandLineFlags(&argc, argv);
    345   if (!s.ok()) {
    346     LOG(ERROR) << "Error parsing command line flags: " << s.ToString();
    347     return -1;
    348   }
    349
    350   // First we load and initialize the model.
    351   std::unique_ptr<tensorflow::Session> session;
    352   string graph_path = tensorflow::io::JoinPath(FLAGS_root_dir, FLAGS_graph);
    353   Status load_graph_status = LoadGraph(graph_path, &session);
    354   if (!load_graph_status.ok()) {
    355     LOG(ERROR) << load_graph_status;
    356     return -1;
    357   }
    358 ```
    359 We load the main graph.
    360
    361 ```C++
    362   // Get the image from disk as a float array of numbers, resized and normalized
    363   // to the specifications the main graph expects.
    364   std::vector<Tensor> resized_tensors;
    365   string image_path = tensorflow::io::JoinPath(FLAGS_root_dir, FLAGS_image);
    366   Status read_tensor_status = ReadTensorFromImageFile(
    367       image_path, FLAGS_input_height, FLAGS_input_width, FLAGS_input_mean,
    368       FLAGS_input_std, &resized_tensors);
    369   if (!read_tensor_status.ok()) {
    370     LOG(ERROR) << read_tensor_status;
    371     return -1;
    372   }
    373   const Tensor& resized_tensor = resized_tensors[0];
    374 ```
    375 Load, resize, and process the input image.
    376
    377 ```C++
    378   // Actually run the image through the model.
    379   std::vector<Tensor> outputs;
    380   Status run_status = session->Run({{FLAGS_input_layer, resized_tensor}},
    381                                    {FLAGS_output_layer}, {}, &outputs);
    382   if (!run_status.ok()) {
    383     LOG(ERROR) << "Running model failed: " << run_status;
    384     return -1;
    385   }
    386 ```
    387 Here we run the loaded graph with the image as an input.
    388
    389 ```C++
    390   // This is for automated testing to make sure we get the expected result with
    391   // the default settings. We know that label 866 (military uniform) should be
    392   // the top label for the Admiral Hopper image.
    393   if (FLAGS_self_test) {
    394     bool expected_matches;
    395     Status check_status = CheckTopLabel(outputs, 866, &expected_matches);
    396     if (!check_status.ok()) {
    397       LOG(ERROR) << "Running check failed: " << check_status;
    398       return -1;
    399     }
    400     if (!expected_matches) {
    401       LOG(ERROR) << "Self-test failed!";
    402       return -1;
    403     }
    404   }
    405 ```
    406 For testing purposes we can check to make sure we get the output we expect here.
    407
    408 ```C++
    409   // Do something interesting with the results we've generated.
    410   Status print_status = PrintTopLabels(outputs, FLAGS_labels);
    411 ```
    412 Finally we print the labels we found.
    413
    414 ```C++
    415   if (!print_status.ok()) {
    416     LOG(ERROR) << "Running print failed: " << print_status;
    417     return -1;
    418   }
    419 ```
    420
    421 The error handling here is using TensorFlow's `Status`
    422 object, which is very convenient because it lets you know whether any error has
    423 occurred with the `ok()` checker, and then can be printed out to give a readable error
    424 message.
    425
    426 In this case we are demonstrating object recognition, but you should be able to
    427 use very similar code on other models you've found or trained yourself, across
    428 all
    429 sorts of domains. We hope this small example gives you some ideas on how to use
    430 TensorFlow within your own products.
    431
    432 > **EXERCISE**: Transfer learning is the idea that, if you know how to solve a task well, you
    433 should be able to transfer some of that understanding to solving related
    434 problems.  One way to perform transfer learning is to remove the final
    435 classification layer of the network and extract
    436 the [next-to-last layer of the CNN](https://arxiv.org/abs/1310.1531), in this case a 2048 dimensional vector.
    437 There's a guide to doing this @{$image_retraining$in the how-to section}.
    438
    439
    440 ## Resources for Learning More
    441
    442 To learn about neural networks in general, Michael Nielsen's
    443 [free online book](http://neuralnetworksanddeeplearning.com/chap1.html)
    444 is an excellent resource. For convolutional neural networks in particular,
    445 Chris Olah has some
    446 [nice blog posts](https://colah.github.io/posts/2014-07-Conv-Nets-Modular/),
    447 and Michael Nielsen's book has a
    448 [great chapter](http://neuralnetworksanddeeplearning.com/chap6.html)
    449 covering them.
    450
    451 To find out more about implementing convolutional neural networks, you can jump
    452 to the TensorFlow @{$deep_cnn$deep convolutional networks tutorial},
    453 or start a bit more gently with our @{$layers$MNIST starter tutorial}.
    454 Finally, if you want to get up to speed on research in this area, you can
    455 read the recent work of all the papers referenced in this tutorial.
    456
    457
